
This Spring project can help you use up an assortment of crafty odds and ends. Use leftover scraps of quilting fabrics and half-used bottles of acrylic craft paint, and raid your stash for buttons to be used as the flower centers.
You can get as creative as you want while painting the frame and pots. Add stripes and polka dots, or paint them solid colors – the choice is yours!
Materials Needed
- scraps of cotton quilting fabrics in desired colors
- thread to match fabrics
- hand sewing needle
- 1-inch plastic buttons
- 3 unfinished wood flowerpots, 1.875″ x .875″ halved (or purchase them already cut in half)
- 4×6-inch unfinished wood frame with wood backing
- craft glue
- acrylic craft paints and paintbrushes
How to Make Fabric Flowers in a Frame?
Lightly sand the flowerpots, frame, and backing. Paint the items as desired using the craft paints. Let the items dry.
Glue the backing to the inside of the frame. Glue the flower pots to the backing inside the frame and mark the stems and leaf areas. Paint the stems and leaves. Let everything dry thoroughly.
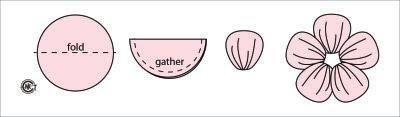
To make the fabric flowers, cut 5 circles for each flower using the pattern. Fold each circle in half and gather along the curved, double raw edges to make a petal (see diagram above) using the needle and thread.
Glue the petals to the backing just above the painted stem. Glue a button to the center of each flower to complete the project.