Needlepoint is a surface stitching technique. The yarn or thread runs through the evenly spaced stiff holes of the canvas. Canvas, also called even-weave fabric, facilitates counted-thread embroidery. This type of stitchwork benefits from the absolute symmetry of canvas mesh. Stitchers measure threads easily. All they need to do is to count the holes on canvas made specifically for that purpose.
Materials Needed to Needlepoint
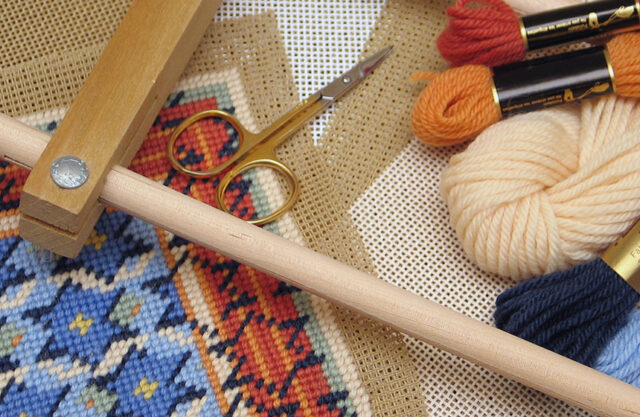
- A piece of canvas
Traditional canvas is a coarse fabric while a variety of modern designs offer nearly any degree of coarseness or fineness. Basically, the coarser the baric, the greater is its count. This, of course, works the opposite way: the finer the fabric, the smaller count it has. - Needlepoint threads and yarn
Needlepoint typically needs stronger, thicker threads than other embroidery crafts such as knitting and crochet. Wool is a popular, widely available and steady yarn that fits most of the needlepoint stitches. - Embroidery needles (tapestry needle)
Thicker thread implies a larger eye. As a mesh is available for any stitch you make the needle does not pierce the fabric. That is why the needle is blunt. A large-eye blunt needle is called a tapestry needle. It is good to have a set of needles to cover a wider range of mesh and thread sizes. - Scissors
I would rather recommend short and sharp than long and blunt. Needlepoint might be less delicate than other embroidery crafts, but it is still a fine stitchwork. You would want to have the scissors that would cut the thread in one snip working very neatly and accurately exactly where you apply them at.The recommended size varies from 3” to 4”. Again, this depends on canvas count and other dimensions you work with.
Finger holes of your scissors also require attention. They must be neither too large nor too small to ensure comfortable and well-controlled needlepoint.
How to Needlepoint Stitches?
There is an array of stitches the needlepoint, otherwise known as canvas works, can be worked with. We are listing and detailing both common and more sophisticated techniques.
Meanwhile, you do not necessarily have to learn or get skilled in all or too many stitches. The truth about canvas work is that a number of designs around provide for but a single type of stitch called Tent Stitch. They require stitches to differ rather in color than in the pattern.
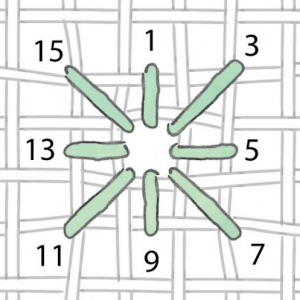
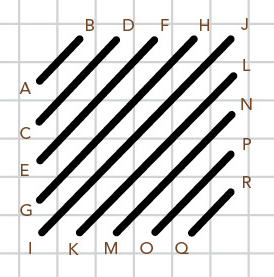
Tent Stitch Needlepoint
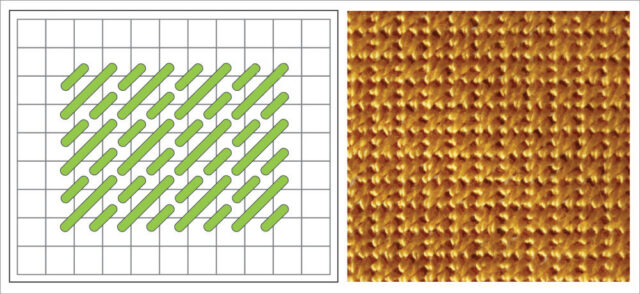
Knowing how to tent stitch is a very basic needlepoint skill. Luckily, it is also very easy to learn. Tent stitch just goes over a single intersection of the canvas. It is perhaps the most obvious needlework technique we can imagine, and also the most common.
The simplicity of the idea still leaves a room for implementation options. There are three methods to work this stitch. It is the back side that reveals the details showing the actual type of tent stitch applied. On the face of canvas, the stitch also may slightly differ in texture and other details depending on the background pattern you follow.
The three tent stitch varieties feature their advantages and drawbacks. Again, they create their specific texture that the viewer can distinguish. You would not want to apply different varieties within the same shape or band if you are going to produce a uniform effect.
How to Needlepoint Basketweave Stitch?
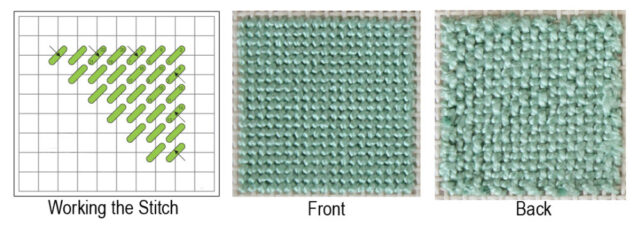
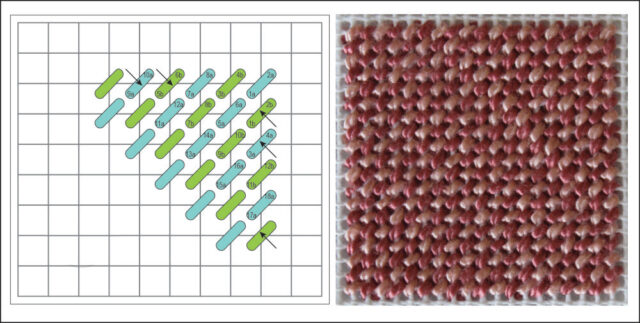
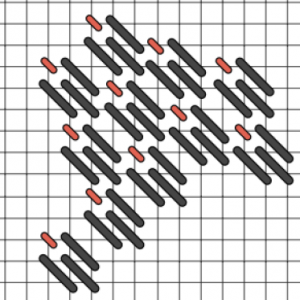
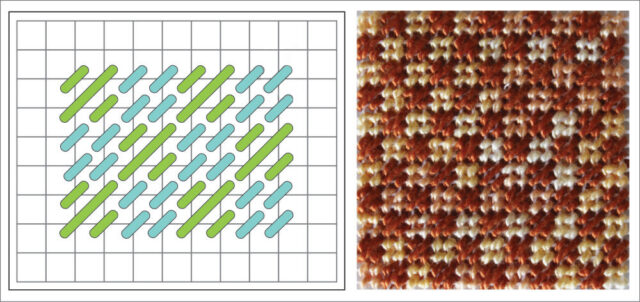
The most popular stitch for filling a large area of the canvas is the Basketweave Stitch. This stitch has the requisite diagonal stitch on the front of the canvas, but has vertical and horizontal stitches on the reverse (back) side of the canvas.
The main benefit to working basketweave over the other types of tent stitches is that there is no distortion – the vertical and horizontal stitches on the back side effectively cancel out the diagonal stitches on the front side, so there’s no pulling of the canvas, causing the distortion. Basketweave also has very good thread coverage.
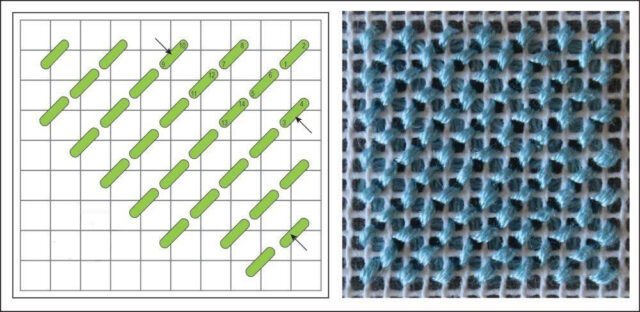
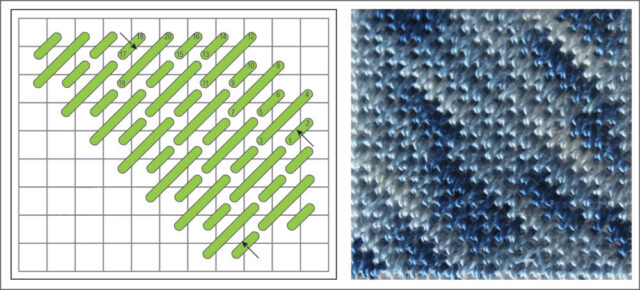
How to Do a Half Cross Stitch?

This is the same stitch used in cross stitch embroidery, and also forms a tidy vertical stitch on the front side of the work – but can severely distort the canvas. At times the warping is so severe that blocking won’t help – the straightened piece will eventually work itself back into its warped shape. While working this stitch may seem more economical than the other two because it requires less thread, it has very poor thread coverage. This leaves you with the possibility of seeing woven ends and tails right through the front side of the work. This stitch should only be used as a last resort, when basketweave or continental stitches are not practical for filling an area.
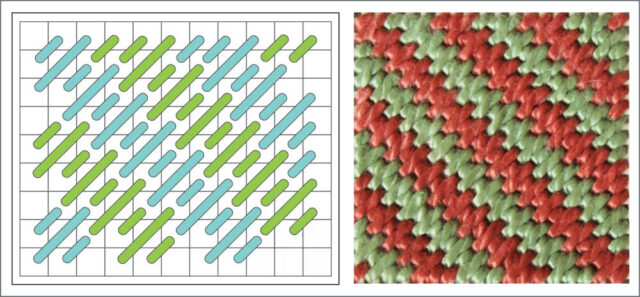
How to Do a Continental Stitch?
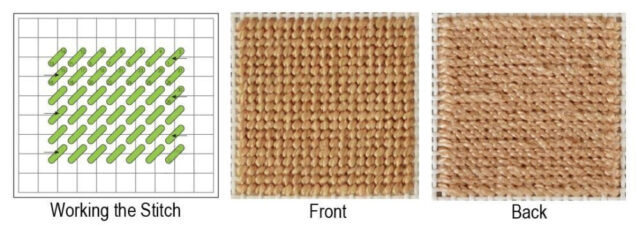
This stitch is also popular with stitchers for working straight lines because the stitch is worked in vertical or horizontal rows and also has good thread coverage. The drawback of using Continental tent stitch is that while there are nice, tidy diagonal stitches on the front side, there are longer diagonal stitches the back on, which cause distortion. Because of this, use the continental stitch for narrow lines or bands and borders, or to fill small areas where basketweave is not practical.
In addition to these three basics stitches, there are also variations of the tent stitch.
Tent Stitch Modifications
Tent stitch occurs in nearly any embroidery pattern worked on canvas. There are three methods to produce it, also the result slightly differs from type to type. Tent Stitch Needlepoint Section above reviews in detail these basic varieties of Tent Stitch called Basketweave, Half Cross and Continental explaining how to do those stitches and their pros and cons. This Section details certain modifications derived from the basic Tent Stitch verities. Many of these can be worked in more than one color.
The most popular tent stitch variations are…
Skipped Basketweave Stitch
This stitch is worked similarly to basic basketweave, but skipping a diagonal row in between each directional pass.
Alternating Basketweave Stitch
Work this stitch in the same manner as the skipped basketweave stitch, with a change of color to fill in each skipped row. All stitches face the same direction.
Reverse Alternating Tent Stitch
Work as you would work the skip basketweave, skipping every other row of the canvas. Fill in the skipped rows using a different color of thread, working the stitch in the opposite direction.
How to Do a Brighton Stitch?
There are two colors in this stitch in two elements. Despite being a complex stitch it goes very simple. A thread of one color is used to get the cross. The cross is to be neatly framed as shown below in three squares worked with the other thread of the second color.
The fragment below represents a dense, throughout texture. It is good for when filling a particular shape. Brighton Stitch is also widely used as a stand-alone design part or may form a separate line in your embroidery.
How to Do a Parisian Stitch and Parisian Variations?


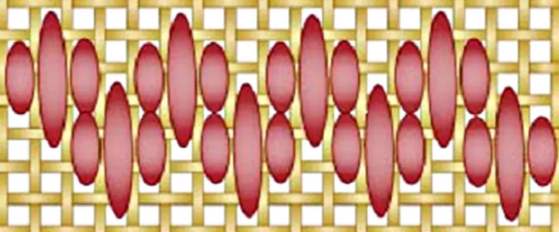
Parisian Stitches are composed of long and short alternating stitches along same horizontal or vertical line.
In the double versions which are often known as Old Florentine stitches, pairs of the two stitch lengths alternate.
The stitch can be used as a solid filling, or to make textured stripes, rows, and bands.
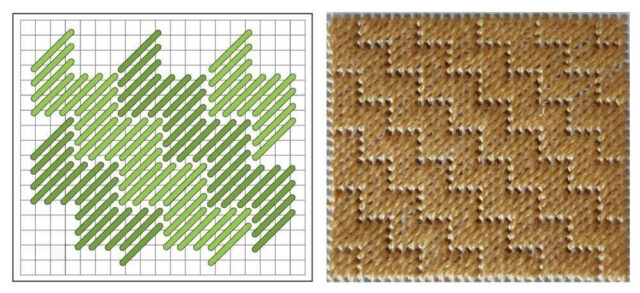
How to Do a Milanese Stitch?
The Milanese Stitch is made of parallel lengths or V-shaped stitches diagonal to the borders of the canvas. The technique actually breaks down into steps, each including four individual stitches.
Those four basic stitches differ in size. You basically start with the smallest and make every next one larger. The first stitch stretches over one intersection, the second overlaps two, the third – three, the fourth – four.
Stick to a single color of thread or combine the colors. Alternate colors within each step of rows in a specific order or at random – if you feel super-creative.
If we view the pattern from a bit another angle there is kind of sequences of the steps running in parallel. You may work those rows in different colors as well. That would be less time-consuming and perhaps more traditional.
This embroidery technique is good both as a pattern filler or a ground stitch. Again, do apply Milanese Stitch as you may find to suit your project best.
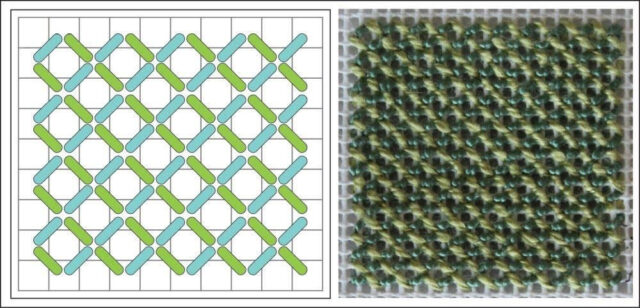
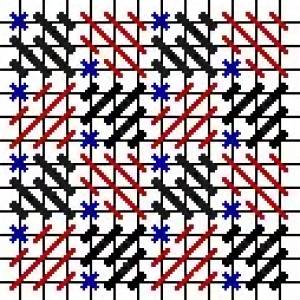
How to Do a Lattice Stitch?
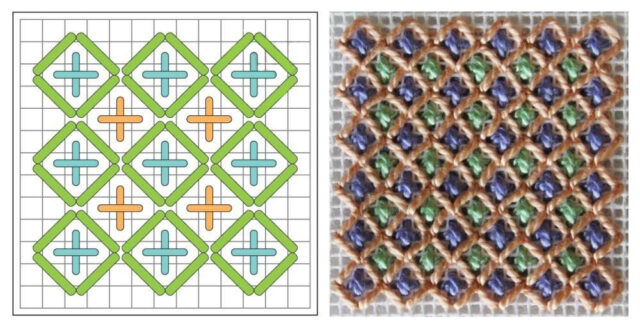
This is similar to Brighton Stitch as it also features a framed upright cross overlapping two horizontal and two vertical threads of the canvas. Diagonal threads running through two intersections make the squares containing the crosses. The surrounding threads provide extra marking so you would want to make the framings first and then stitch the cross stitches of selected colors within.
This stitch looks best worked in two or more colors (I used 3 colors in the sample). Use it to fill large areas of a design, or as a background, or in bands and borders. You could even use the upright cross stitches to form a pattern within the area stitched.
While the sample shown here looks very Easter or Spring-like (I’m thinking of using it as an Easter Egg filling), a simple change of the colors from pastels to the colors of turning leaves can transform the stitch into a perfect Autumn textured stitch, or use red, green and white for a Christmas project.
How to Do a Chevron Stitch?
Like the Vertical Parisian Stitch reviewed above, the Chevron Stitch features a vertical design made of parallel upright stitches. Unlike the Parisian Stitch, this does not alternate lengths of stitches made within bordering lines. The Chevron Stitch arranges parallel stitches of the same length in waves as shown below. As a short length follows a long length along each line forming exactly the same sequence, an up and down pattern alternates two lengths of otherwise same-shaped waves. Bargello projects favor the Chevron Stitch or its math-like precision.
This stitch usually includes more than one color. Three colors create a good contrast if your alternate colors in two wider waves. You may shift the stitch in more sophisticated patterns or run straight bands.
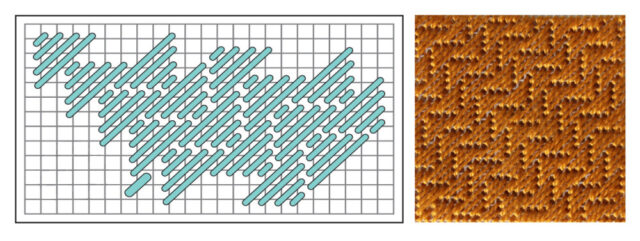
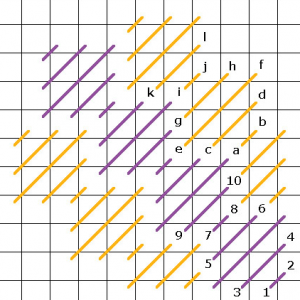
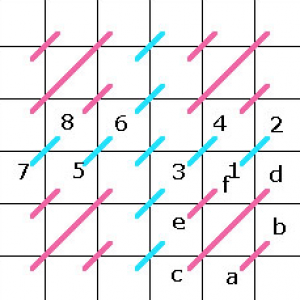
How to Do a Byzantine Stitch?
This is to be made of parallel diagonal stitches of the same length arranged in waves. Each wave follows the other at exactly the same interval. The result looks impressive; Byzantine is a perfect stitch to work within a large shape to be filled. Use two colors to make it really fabulous.
The waves look very vivid as every four stitches within the same horizontal or vertical band cover three intersections of the mesh. For the best coverage on the back side of the canvas, work the stitch from the lower left to the upper right, working the rows from the top left to the lower right.
I’ve used a single color in the sample shown below, but you can work each diagonal row of steps in any number of colors.
How to Do an Algerian Stitch and Its Variations?
The Algerian Stitch is most commonly seen worked as an eyelet stitch, but there is also a plaited version that is similar to a fish bone stitch.
When working the Algerian stitch as an eye or eyelet, the stitch can be worked over any number of threads in the canvas. When worked over a single thread, the result is a very small star that has the illusion of a large center opening. When worked over two or more threads, it looks more like a double cross stitch with a small hole in the center.
The Algerian stitch can be used as a filler, in bands and rows, or individually as a single stitch.
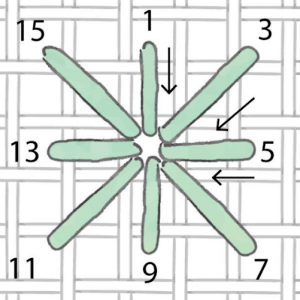
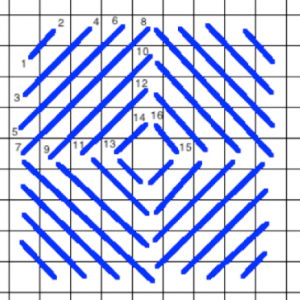
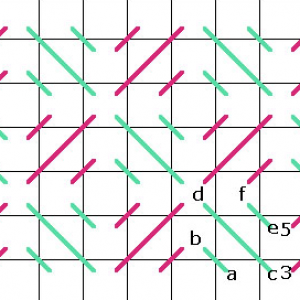
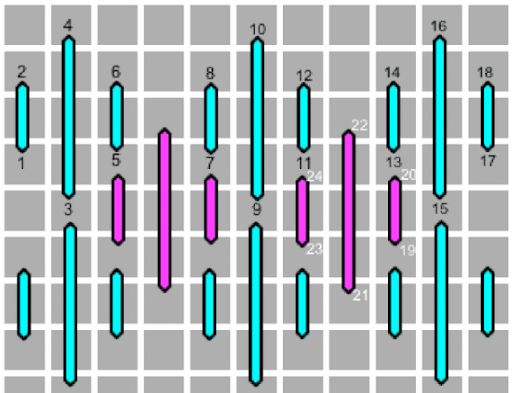
How to Do a Milky Way Stitch?
The Milky Way stitch looks magnificent and slightly mysterious if contrasted by dark dim ground of canvas it is worked on. Also called Starry Night, the stitch actually blinks as a sky full of stars!
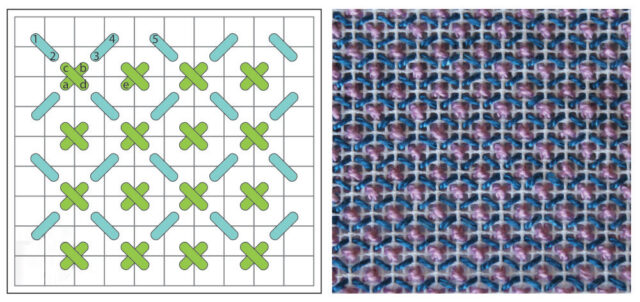
Follow horizontal lines when working the Milky Way stitch. Experienced stitchers recommend sticking to the following workflow:
- Stitch the upper row of blue strips as shown at the chart below first, from left to right.
- Stitch the row of crosses below the upper row.
- Turn the canvas upside down.
- Stitch the upper unworked rows of strips and crosses from left to right.
- Turn the canvas upside down and repeat the above steps until complete working the stitch.
How to Do a Scotch Stitch and Scotch Variations?
Scotch Stitch requires very basic skills yet offers an array of easy-to-make modifications. It is a good filler for any designs you are working. The stitchwork creates rich layers on canvas emphasizing the shapes of the pattern.
Some Scotch stitches may look best when worked in more than one color. This would add the accuracy of mathematical beauty to the patterns they fill.
These are rather space-demanding techniques. You would want to check beforehand if the area the stitch is to be worked on is large enough.
How to Do a Mosaic Stitch and Variations?
Mosaic Stitch consists of adjacent units running in diagonal. All the threads are parallel to each other. Each unit actually contains three stitches, two short ones and a long one. The short ones are laterals so that the long stitch is in the middle.
Mosaic Stitch follows a pattern that would remind you of the Scotch stitch. Both are simple needlework stitches and include a range of variations that are also easy to complete. Mosaic Stitch is a compact pattern (unlike Scotch stitch) as its basic unit is worked over four cross-sections only (two small stitches covering one cross-section and a single longer stitch worked over two cross-sections). Each unit thus remains within a single square of the canvas.
This stitch is good to work in two or more colors, in particular in its variations.
Original Mosaic Stitch
Use one color for long stitches and the other for short stitches to get two-color mosaic stitch out of this.
Reverse Mosaic Stitch
Work every unit of three stitches in the opposite direction. This is worked in two colors basically separating the stitches running crosswise to each other. It is also known as a Reverse Alternating Mosaic Stitch.
Framed Mosaic
In this version of the stitch, each small square is outlined with a tent stitch.
Checkerboard Mosaic
To make the checkerboard version of the stitch, each square mosaic stitch alternates with a square made from 4 tent stitches.
Diagonal Mosaic
In this version, the stitch is worked in diagonal rows.
Diagonal Alternating Mosaic
Worked the same is diagonal mosaic, but colors alternate every other row.
How to Do a Hungarian Stitch and Variations?
Hungarian Stitch is basically an upright version of Mosaic Stitch. Again, the latter is a diagonal pattern.
Hungarian Stitch consists of parallel adjacent units of three stitches. Just like in Mosaic Stitch, two smaller lengths have a longer length in between.
This easy-to-work stitch has a variety of variations, which can all be used to add pretty textured fills to any shape in your needlepoint project. Many of the stitches can be worked in two or more colors.