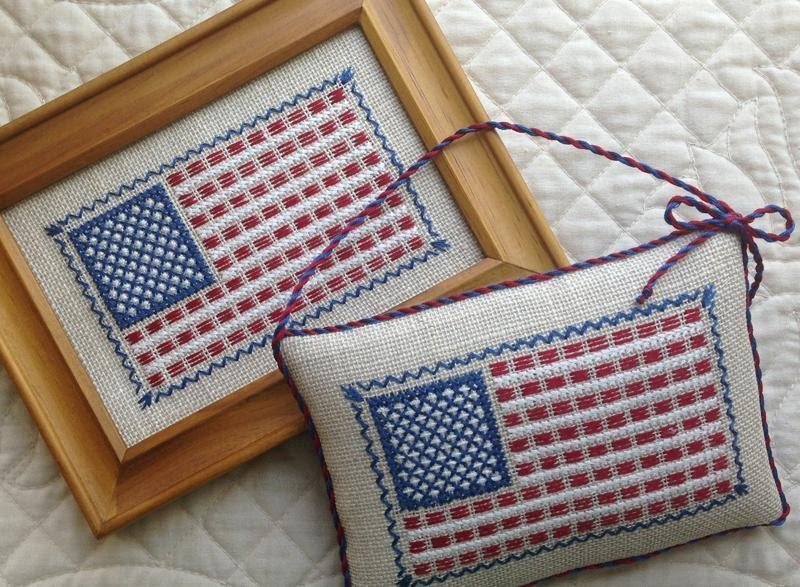
Make a Counted Thread Flag using just 3 colors of floss, a piece of linen and basic counted thread stitches. This project is a terrific way to build your skills. It’s also a lot of fun to make!
I’ve finished my project two ways – as a stuffed ornament, and framed as wall art (the piece fits a standard 4×6 photo frame from the craft store). The counted thread flag would also look fabulous finished as a small accent pillow or used as the pocket on a denim tote bag.
Materials Needed
- DMC 6-strand embroidery floss in colors 312, Blanc and 498.
- 8×10 inch piece of 18-count linen (sample used Wichelt 100% linen in lambswool.)
- Size 22 tapestry needle.
- Basic embroidery supplies (scissors, hoop, needle threader if needed.)
How to Sew a Counted Thread Flag?
NOTE: Two strands of 6-strand floss are used throughout the project unless otherwise indicated.
Edge-finish the fabric if needed, using a machine zigzag stitch or seam sealant. I was lazy and didn’t do any edge-finishing…
Lay the fabric on your work surface having the longer edges of the fabric along the top and bottom edges, and the shorter ones along the sides. Mark the fabric two inches from the upper left and top edges. Use a marking pin or a dot using a water-soluble fabric marking pen. This is where you will begin your stitching.
Overall Guidance and General Pattern
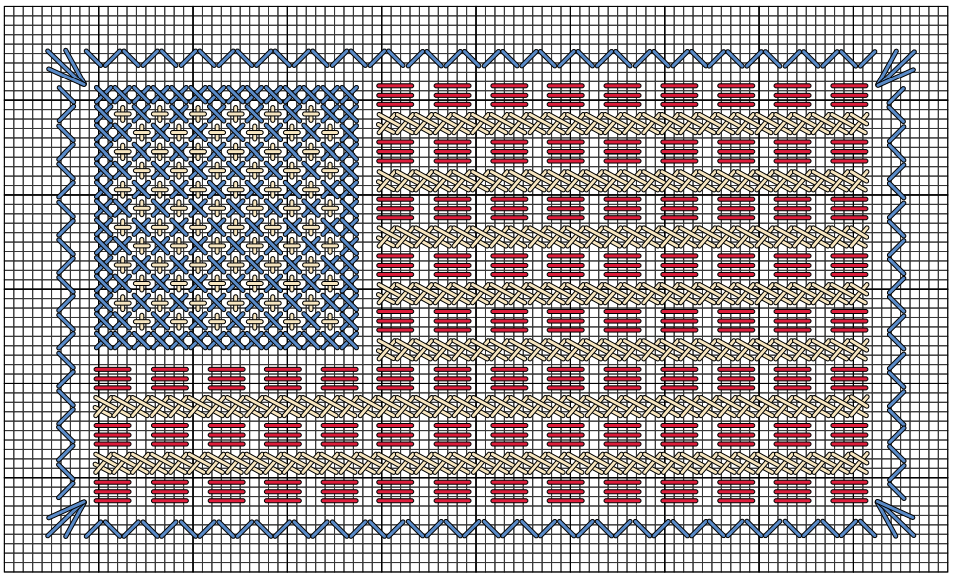
Start the piece at the dot, 2 inches from the upper right corner. Follow the chart given below. Stitch using 2 strands of the 6-strand floss in your needle for all areas.
How to Sew an American Flag? Step-by-Step Guidance
This is a step-by-step guidance of four parts starting from the starts area and ending with stitching the blue border through working the red&white stripes.
Part 1 – the Stars Area

We’re starting our project in the stars area in the upper left corner of the piece. We’ll be using two different stitches; the standard counted cross stitch and the upright cross stitch. If you need diagrams for working the stitches, refer to the counted stitches page.
Working the first stitch at the mark you made 2 inches from the sides, stitch the stars area of the flag in cross stitch over two threads in the fabric. Use the graph below and two strands of the blue 6-strand floss (color 312). Each line in the graph represents a thread in the fabric.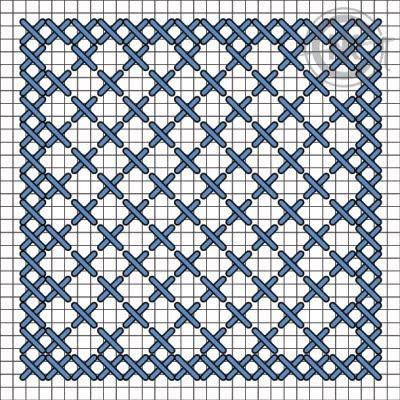
After working the blue, stitch the “stars” in the open spaces using two strands of the blanc/white floss in upright cross stitch.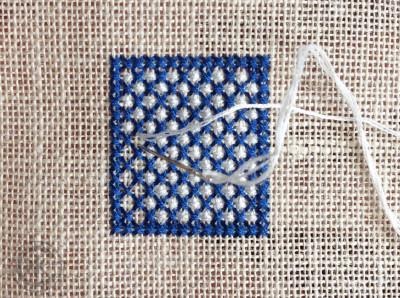
The stitch is worked in the gaps between the two vertical and horizontal threads in the fabric. Work the horizontal part of the stitch first, and then the upright part of the stitch – this way all of the top stitches will be facing the same direction.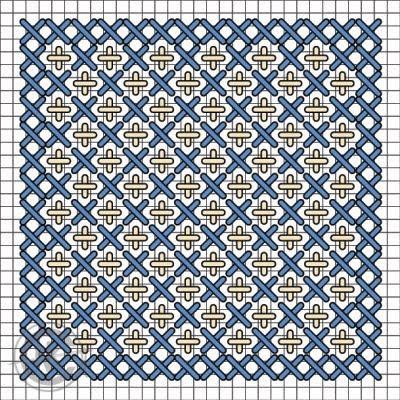
Part 2 – the Red Stripes
Next, we’re working the red stripes in a basic darning stitch pattern – each strip is made from three rows of running stitch using two strands of the red floss, starting with the uppermost stripe.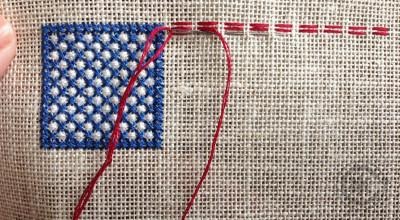
The first row of running stitches is worked two fabric threads to the right of the top left blue cross stitch from Part 1. Work nine running stitches, with each stitch worked over 4 threads, and then under 2 threads.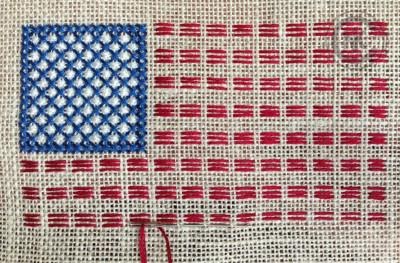
Work three rows of running stitches for each red stripe, spacing the stripes 4 fabric threads apart. You can enlarge the image above, or refer to the chart below. Each line in the graph equals one thread in the fabric – it’s easy to follow.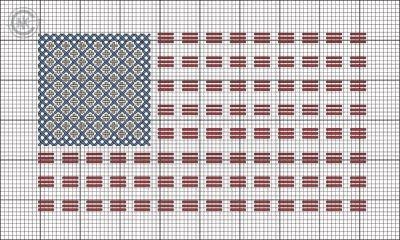
Part 2 – the White Stripes
Next, we’re working the white stripes in the flag. These stripes are worked in long-armed cross stitch.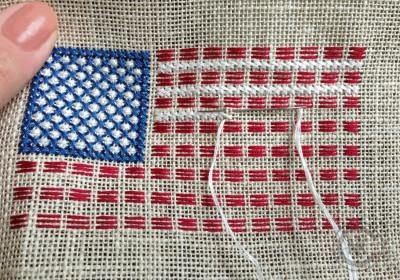
Each short leg is worked over two stitches, while the longer legs are worked over 4 stitches. This leaves you with one open thread between the red and white stripes in the flag. You can see in detail below – remember that one line in the graph equals one thread in the fabric.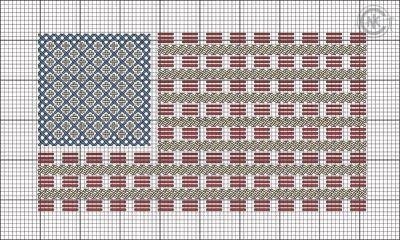
You’ll need to start the end of each row of long-armed cross stitch with a compensation stitch. The same will be done at the end of the row. These are partial stitches that are used to make the ends of the rows tidy. They can be seen below at the arrows (the pink stitches).
When working a row from left to right, the first stitch will be a compensation stitch, worked which is then crossed by the first full stitch. At the end of the row, the compensation stitch will be the last stitch worked and will cross over the final full stitch.
Part 4 – Final Installment: Stitching the Blue Border
In the 4th and final installment of the Counted Thread Flag Tutorial we’re stitching the blue border that surrounds the completed flag.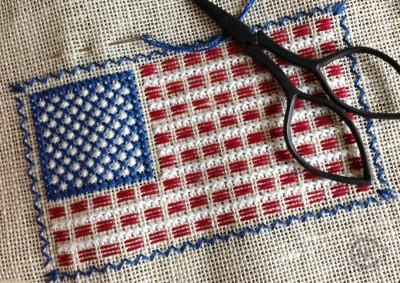
Referring to the chart, stitch the zigzag border spacing it two fabric threads from the red strips. When using the graph, remember that each line in the graph is equal to one thread in the fabric, making it easy to see where to begin stitching.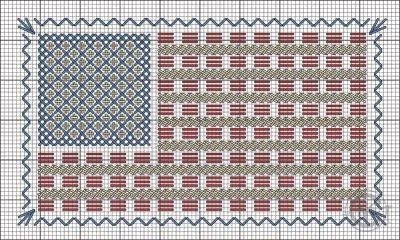
Work a diagonal stitch from the lower left to the upper right. Then insert your needle up through the back of the fabric at the lower right and down into the fabric in the same hole as the “downward” motion of the previous stitch.
When you get to the corners, keep in mind that the little corner motif does not line up perfectly at the corners. As you can see in the image above, the stitches align at the bottom with the long upper and lower borders, but the sides extend one thread beyond the side borders. The finished corner motif – being just one thread off – looks like it lines up when viewing the project from a distance, but it does not line up perfectly.
No one will know but you and me…?
Now that you have completed the stitching, finish your project as an ornament or frame your completed embroidery in a standard 4×6″ pre-made frame.